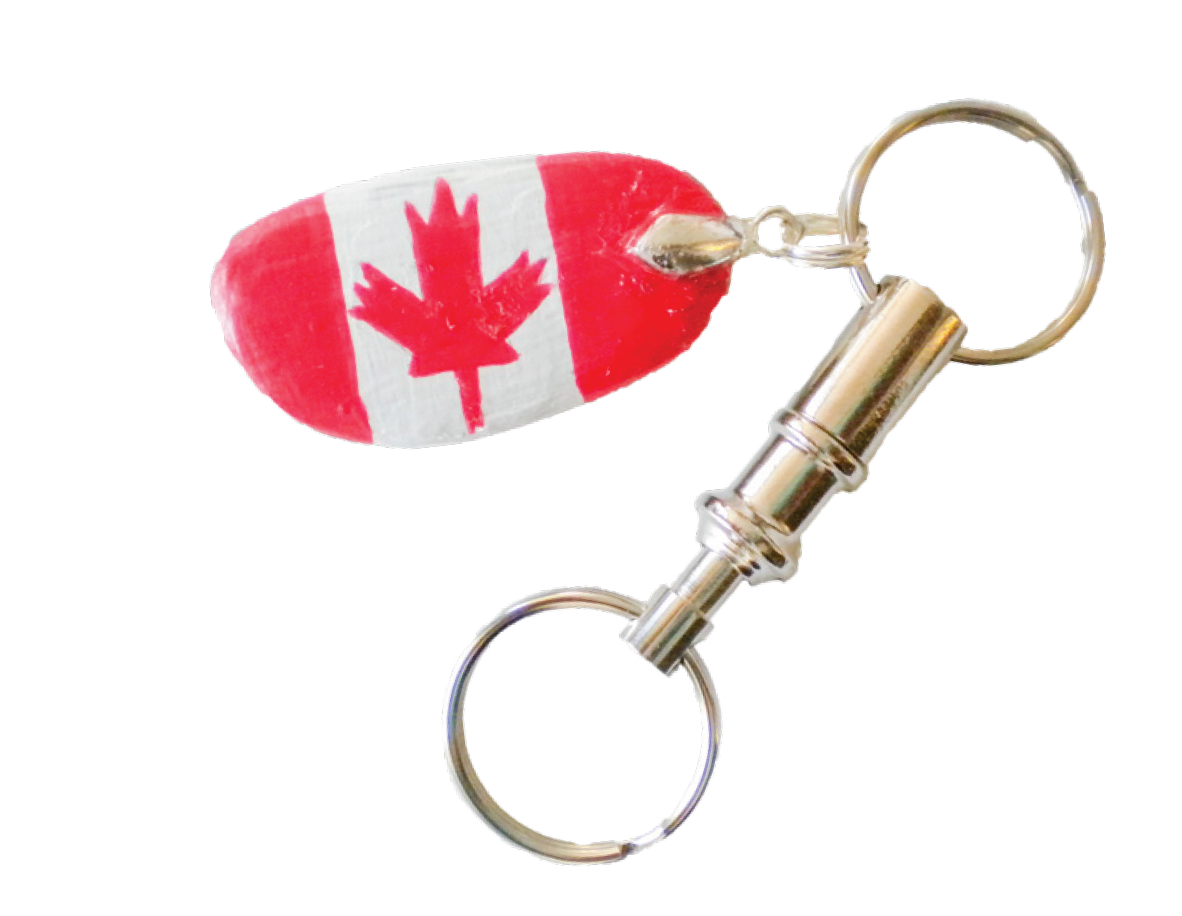
Canada Rocks! Keychain
Background
People have long used natural materials such as bone, wood, shells, fibre or stone for artistic expression. Some of the most lasting creations have used rocks and minerals. Today, we can appreciate rock-based art created anywhere from many thousands of years ago to the present day because of the endurance of stone. From prehistoric pictographs (drawn or painted) and petroglyphs (carved) on cave walls and the famous Stone Age Venus figurines through to spectacular Greek friezes, intricately carved Asian temples (Angkor Wat) and Renaissance masterpieces, rocks and minerals have yielded incredible art.
Your kids can also produce works of art with rocks and minerals. First of all, they are natural collectors; how often do kids go home with rocks in their pockets? Ask them to use any rocks and minerals they have collected to create a short “show and tell” video to share. Naturally creative, they can then transform their rocks into beautiful pieces of art, with some additional lessons, guidance and resourcefulness.
Middle school is a time of transition, with many kids experiencing changes in school and home life. For some, this might be the first time they are considered responsible enough to have their own house key. Why not mark this milestone by having them create Canada Rocks! keychains for their first set of keys? Alternately, they could make paper weights or even door stops, depending on rock size.
Materials
- One long, smooth and flat rock
- Pencil with eraser
- Metric ruler
- Red and white tempera paint
- Maple leaf template (Can be found at firstpalette.com)
- Brushes
- Clear spray lacquer or clear nail polish
- Keychain with jump ring, bell caps
- Epoxy or jewellery glue
- Paper clip or toothpick
- Round-nose pliers
- Sand or molding clay
Instructions
- Rinse the rock to remove soil or dust that would prevent paint from adhering.
- Paint the top of the rock white and allow the paint to dry thoroughly.
- Divide the painted space on the rock into three panels, similar to those of the Canadian flag. The centre section should be twice the width of the panel to the left or right.
- Fill in the left and right panels with red paint. Leave the centre panel white.
- Using the pencil, trace the maple leaf template onto the middle of the central panel.
- Go over the maple leaf outline with red paint and fill in.
- Allow the paint to dry completely, then spray with clear lacquer.
- Decide where on the painted rock the bell cap will be attached. Fit the bell cap snugly over the rock, using pliers if necessary, ensuring the bell cap fingers are all in contact with the rock surface. One or two of the bell cap fingers could be cut off to ensure a secure fit.
- With a toothpick or paper clip, lightly coat the inside of the bell cap with glue. Make sure to coat the underside of all the bell cap fingers.
- Place the glue-covered bell cap on the part of the rock it was shaped around.
- Once the bell cap and stone are together, place the rock in the sand or molding clay so that the bell cap is sticking straight up. The glue could take from 15 minutes to two hours to set and harden completely. Placing the rock in the sand will ensure that the cap remains in the position it was set.
- Once the glue has hardened, attach the bell-capped stone to the key chain. Using two pairs of pliers, hold the keychain jump ring on both sides of the opening; push one side backward and pull the other side forward. DO NOT PULL IT APART. If you pull it apart it is very difficult to get the ring to close properly.
- Slide the bell cap loop onto the open jump ring. Using the pliers, close the jump ring.