Engineer and Build an Underground Mine
Background
Information Bulletin: Engineer and Build an Underground Mine
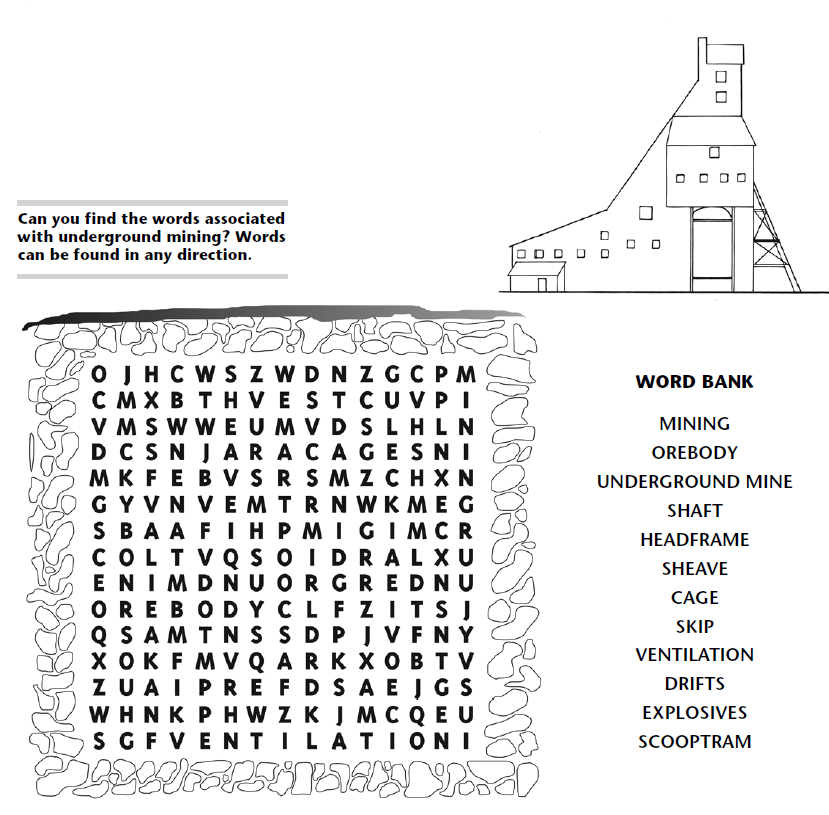
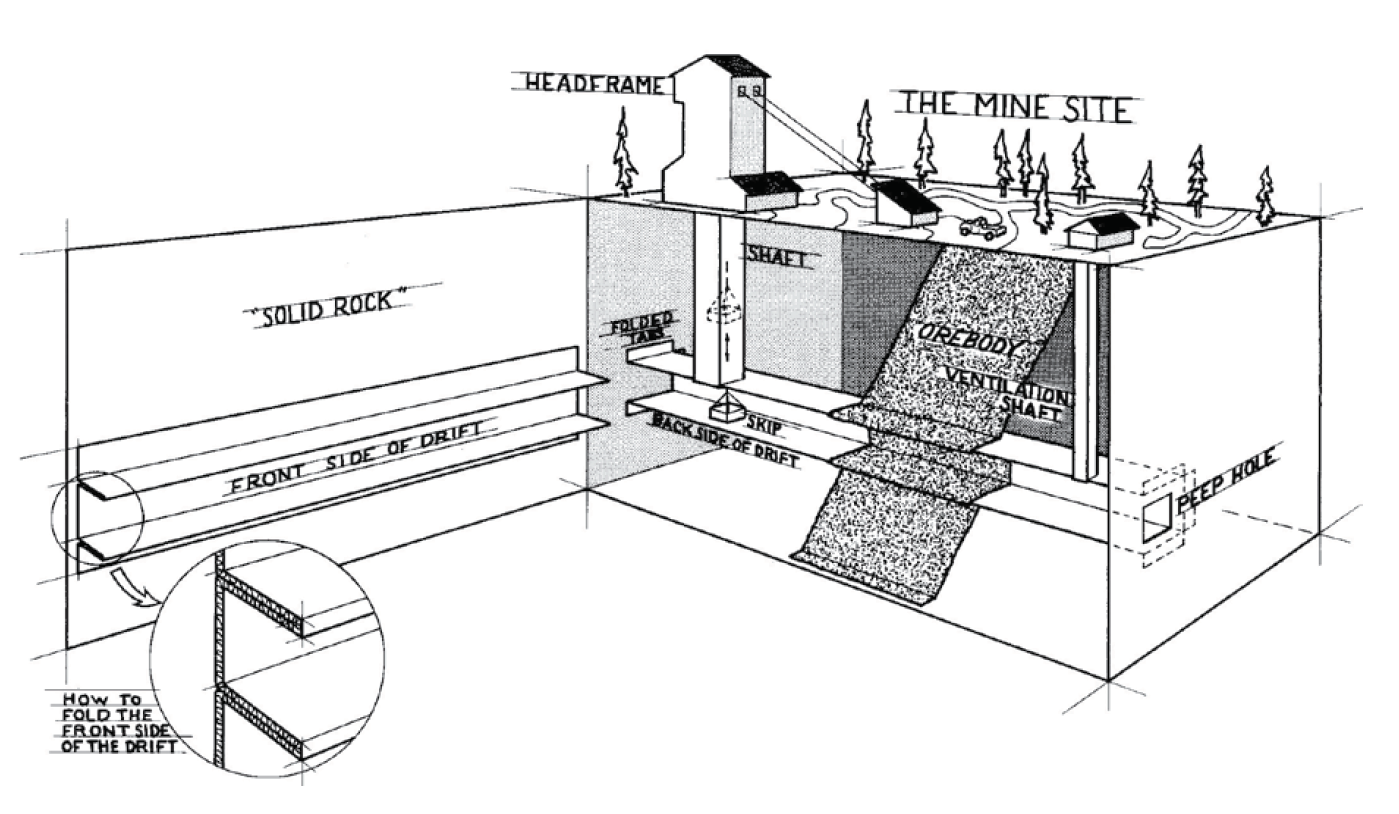
MINING is a temporary use of the land during which valuable rock containing metal or minerals, called an OREBODY, is removed from the Earth. An UNDERGROUND MINE is created when deep tunnels are dug to reach an orebody. The main vertical tunnel is called a SHAFT. At its top is a wood, steel or concrete HEADFRAME containing a SHEAVE (pulley system) that is attached to an elevator or CAGE to transport the miners and equipment from the surface to the underground workings. The sheave also supports a bucket or SKIP to lift the broken rock and ore to the surface.
Other vertical tunnels called VENTILATION SHAFTS bring fresh air to the mine. From the shaft, horizontal tunnels called DRIFTS provide access to the orebody. EXPLOSIVES break up the rock so it can be picked up by a low, narrow truck with a bucket up front, called a SCOOPTRAM. It is driven to the shaft and the ore is dumped into the skip, which brings it to the surface.
Materials
Construction : Material Needed
Mine Site : Cardboard box
Head Frame : Cardboard/construction paper/popsicle sticks
Buildings on Site : Cardboard/construction paper/miniature toy buildings
Trucks : Construction paper/miniature toy trucks
Trees : Construction paper/miniature toy trees/twigs
Shaft : Cardboard/construction paper/cardboard tubes
Cage/Skip : Cardboard/construction paper/string
Ventilation Shaft : Cardboard/construction paper/cardboard tubes
Drift : Cardboard/cardboard tubes
Ore host rock : Aluminum foil
Rock : Construction paper/newspaper/painted fibre fill
Other supplies : Masking tape or duct tape, paint, flashlight
Preparation
Read the Information Bulletin and finish the word search to learn some of the words associated with underground mining. Then get ready to build your underground mine model!
Instructions
- Prepare your box, the mine site, by taping all sides closed.
- Cut open one side of the box to make a “door”.
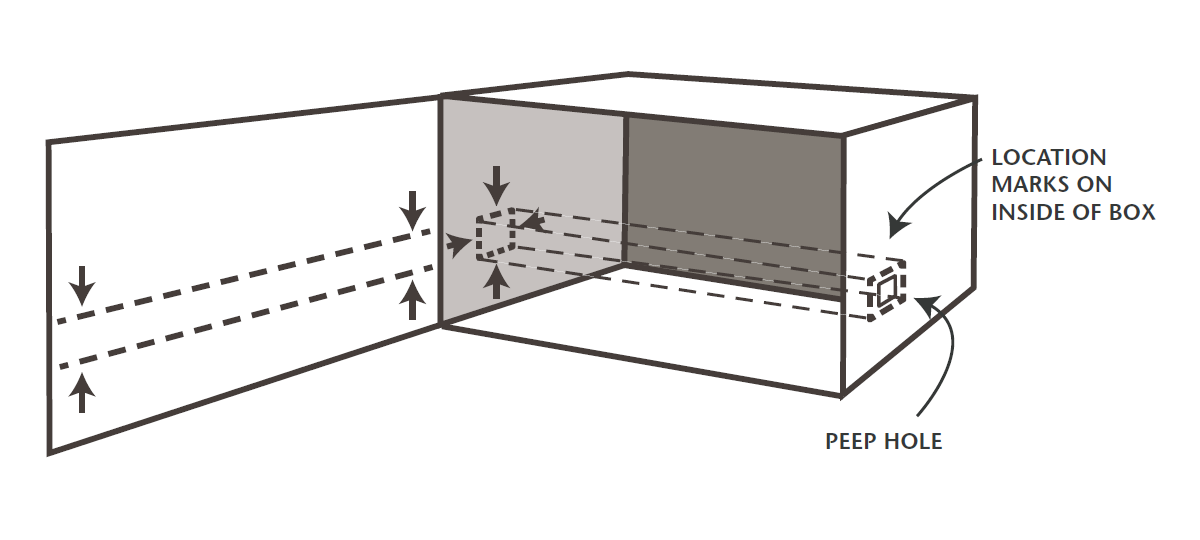
- Locate the position of a drift by measuring and drawing horizontal lines on the inside of the “door” Draw corresponding marks on the insides of the sides of the box as shown below. Cut a “peep hole” out of the right side of the box at your marks.
- Your drift has two sides (back side and front side). Create both sides of your drift by either folding cardboard as shown in the completed model illustration or by cutting a stiff cardboard tube in half lengthwise. When folding the cardboard it helps to use a strong straight edge, like the edge of a tabletop, to ensure you get a straight edge
- Using your drift location marks as guides, glue the front side of the drift to the “door”. Attach the back side of the drift by gluing the folded tabs at both ends to the sides of the box. Ensure that the back side of the drift lines up with the “peep hole”.
- Make a shaft out of cardboard by folding four sides into a tube or by using a round cardboard tube. Make a hole in the top of the box slightly larger than the shaft, directly above the left end of the drift. Cut a corresponding hole in the top of the drift. Lower the shaft through the surface to the top of the drift at the hole. In a real mine, the shaft is dug down through solid rock to the drift level and then the drifts are dug horizontally.
- Make a smaller ventilation shaft in your mine by repeating Step 6 on the right end of the drift.
- Make a headframe (building at the top of the shaft) and place it over the shaft hole. A small building for fans should be made for the top of the ventilation shaft. Make a cage/slip out of string and construction paper. Be sure that it is small enough to fit through the shaft.
- It’s time to make the orebody! Take a sheet of aluminum foil (ore host rock) long enough to extend from the top of the box to the bottom of the box with at least 15 cm extra. Fold the foil to a width approximately 10 to 15 cm. Tape the foil to the inside of the box top and to the top of the drift. Press the foil into the drift along the top, back and bottom allowing the remaining foil to extend to the bottom of the box. Secure with tape at the bottom of the drift and box.
- Carefully fill the remaining open spaces in the box with shredded newspaper or painted fibre fill. This will give the impression that the drift is actually passing through solid rock. Complete your model by painting the surface and placing trees and trucks to represent a real mine.
- When the “door” of the model is closed, peek into the mine by shinning a flashlight into the “peep hole”. This really gives you the feeling of being underground.
- Use your model to deliver a short video presentation about the processes of mining and milling. Describe how ore is taken from the ground (mined) and processed (milled).
